It’s been over one year since I posted the last instalment in the series on “How to make the Perfect Prosciutto”. I really feel awful about this, since many of you seem to have decided to make your own prosciutto and I’ve left you hanging during the final moment. I’ve been called a pork-tease (and worse!) and well enough is enough.

If you weren’t aware, the reason that I haven’t written in some time is because I have a new baby (well not a human one) but a startup named Appifier that has built technology for building native smartphone apps in less than a minute, without a single line of code. It’s amazing how much time such an endeavour can take up and I really am thankful to my family, friends and even you for patiently sticking around through this.

Thankfully, if you’ve been diligently following the recipe so far, the final installment is a real piece of cake. You’ll need:

  • Ground Cayenne Pepper
  • Ground Paprika
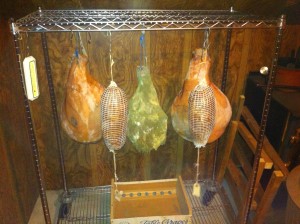
  • A cool, dark room. My room has an average temperature of 15 degrees celsius (58 fahrenheit) and 55% humidity

Your goal is to cover any meat that is not covered by a layer of hide. You do this for two reasons. Firstly, some of the flavour does seep down into the meat. Secondly, the spices are a real turn off for most critters that try to get a taste of your delicious prosciutto before it’s ready.

Spread the spice mixture on the exposed meat. ensuring that it is completely covered. When you’re doing this, make sure that you put a generous amount in the gap at the top of the ham, between the bones. This is a common trouble spot and you want to ensure that it’s well covered.

Prosciutto and Capicollo in Cellar

Prosciutto and Capicollo in my Cellar

Now’s the hardest part for those of you on an empty stomach. Wait!

You’ll have to wait at least 1 year and sometimes up to 18 months to be on the safe side. Your ham will harden and mould will cover most of the meat. Don’t be worried, this is a great sign! When you decide to cut your prosciutto, you first wash this off then use a knife to carve off the tough layer of hardened flesh to get at beautiful cured prosciutto.

Good luck, write to me and send pictures in if you decide to follow this and do it yourself. I’d love to see what you get!

This weekend my phone buzzed with news of a comment on one of my blog posts. As this is a fairly rare occurrence, I was particularly surprised to note that it was from a reader who was facing a prosciutto crisis involving a missing aitchbone and a butcher shop full of suspects. Even more surprising was that I have readers at all, and after checking my blog’s stats, it turns out that most of you come here to learn how to “make your own perfect prosciutto”. (However, there were some outlier google searches that noted that people got here by looking up deviant behaviours involving salt and depravity… shame on you!)

Since Prosciutto time is right around the corner, it’s now time for a late (but nonetheless timely and accurate!) second installment.

If you’ve successfully purchased and salted and the required meat according to my first post, you’re now ready to make the magic happen and actually cure the meat of most of its bacterial evils through the use of a flavourful brine.

You’ll need:

Tools:

  • A clean bin with a lid that your prosciutto-to-be can fit inside of
  • A large sieve or cheesecloth
  • Pots and patience

Ingredients:

  1. 15 liters of water
  2. 15 cups of salt (Yes, it’s a lot of salt…)
  3. 7.5 cups of dark brown sugar
  4. 5 tbsp of saltpeter
  5. 1 bunch of thyme
  6. 15 sprigs of rosemary
  7. 15 bay leaves
  8. 10 tablespoons of crushed juniper berries

Once you’ve assembled the necessary tools and ingredients, it’s time to get cookin’. Begin by adding the salt, and saltpeter to the water and bring the pot(s) to a boil. Once the water is boiling, stir to ensure that you’ve dissolved all the salt and add in the brown sugar, stirring as needed to ensure that it is dissolved as well. At this point, the water will take on a rich, deep brown color. Now things get fragrant. If you have cheesecloth on hand, assemble a herb bouquet of thyme, rosemary, bay leaves and the juniper berries. If you don’t have cheesecloth, simply tie the fresh herbs and bay leaves together as well as you can and make sure you have a sieve for later. Bring the water to a boil once more and let it simmer for 5 minutes. Remove from heat.

Wait until the brine you’ve made has cooled to room temperature and remove the herb bouquet if you have one. If you don’t, once the brine has cooled, simply pour the brine from the pot through a sieve and into the bin you’ll be using to store the meat during the brining process. Once the liquid has been transferred, place your meat in the bin ensuring that it remains submerged. If necessary, weigh the meat down and cover the bin with the lid, storing it in a cool dry place.

For a 25-30lb piece of pork, you’ll want to ensure that the pork spends 8 days immersed in the brine. Note that if you weighed the meat down to keep it submerged, you may need to open the bin daily in order to rotate the meat and ensure that the part that is in contact with the weight is changed in order to ensure that the entire surface area of the meat has been exposed to the brine for an adequate amount of time.

If you’re curious to know more about how brine works to not only dry the meat (via osmosis) but also leads to meat that is softer and tastier, Cooking for Engineers has a great article on the subject that involves semi-permeable membranes, protein breakdown and other filthy bits of erotica.

In a few days (yes, I promise), I’ll post the Here’s the final step on how to protect the meat when you remove it from the brine and start the year-long curing process. Until then, stock up on some paprika and cayenne!

So you want to make your own prosciutto? If all goes well, you’ll eventually be rewarded by ridiculously delicious cured ham. I’ve been told that it’s also really sexy and virile. If you screw up, you’ll have blown about 50$ and have to salvage what meat you can through putting it to stock. Potential mates will also snicker at you and you will lose your sexy and virile mystique. The lesson here folks is: don’t screw up.

To that end, here are some ground rules:

  1. Follow the recipe. At least the first time. Curing meat is easy but you probably aren’t used to it. As a result, if you go out on a limb and follow a hunch you may run into big trouble.
  2. Be patient. It takes time to prepare prosciutto. 2 days for bleeding, 10 days in a flavoured brine and at least 365 spent drying. If you cut anything short you will end up with a prosciutto that is either too wet or too dry.
  3. Don’t be afraid of mould. It’s a good sign, question yourself if none grows during the drying process.
  4. If something doesn’t smell right, stop, think and seek help. Recipes aren’t foolproof, not even this one. So many environmental factors come into play. You really need to keep an eye on your prosciutto throughout the process so if there is ever any rot (I haven’t seen any in years of following this recipe) you can try to salvage what is left of your prosciutto.

Now that you know the rules of the game, you’re ready to actually get out there and start curin’ some pork.

Choosing

All you need to get started

Pork Leg and Salt : All you need to get started

The first step in making prosciutto is running out to buy a leg of pork. You’ll want to see a reputable butcher for this and ask him to round off the portion of the leg that connects to the pig’s torso (the lowest portion of the picture shown at the left of this paragraph). This will ensure that your prosciutto has a nice shape that’s easy for you to cut and deal with later. In Montreal, I usually go to Charcuterie Noel since they tend to get their meat from good suppliers and while waiting at the butcher’s counter I often see many pork legs go by, thus helping to ensure a healthy inventory turnover.

You’ll want to aim for a leg that is around 10-12 kilograms. Bigger legs give you bigger chunks that are ideal for slicing however once you get past 12 kilos the meat is generally tougher and not as desirable. Pork legs smaller than 10 kilos will often provide great testing and tender cured hams, but are less pleasant to slice.

One final note, if the butcher suggests removing the bone around the ball joint that connects to the pig’s hip, politely decline. Although many traditional recipes remove this bone before curing, this generally results in increased spoilage. Leaving it in will only make cutting the cured prosciutto more exciting. Yes… exciting….

Bleeding

Once you’ve got the meat on your kitchen counter, it’s time to start the curing process that turns this big hunk of pork into prosciutto. Before we begin, I’d like to bring up a topic from high school chemistry that is at the heart of this recipe: osmosis

Osmosis Diagram

Osmosis: Science at work

In order to cure meat, we’re going to need to dehydrate it. In order to dehydrate it and infuse it with the p roper flavours and rich colour we’re going to avoid using anything like those cheesy fruit dryers you see on infomercials. Instead, we’re going to use salt in high concentrations to cause liquid inside the prosciutto to come through a thin membrane of fat and muscle tissue and seep out. Thus, before we start gradually drying the meat in open air, we need to bleed and brine it to remove as much liquid as possible.

The first step in this process is to “bleed” the meat to remove part of the excess liquid in the pork. In this stage, we’ll be applying copious amounts of salt (about 600g) to a pork leg in order to start the curing process.

1. Liberally apply salt to the exposed muscle of the pork leg, ensuring that you work it into any nooks and crannies. Apply a less concentrated layer to the outer skin as well.

Salt sides and bottom

Thoroughly Salted Prosciutto

2. When salting all the crevices, pay special attention to this area. Ensure that you work salt in around the bone and on the meat underneath the skin.

salted opening

Salted Crevice

Once you’ve applied salt to the pork leg, bring it to the cool, damp room you plan to eventually dry it in. Prepare a surface for the leg to lie flat on and some receptacle in which to collect the blood and any other oozings that will be extracted through osmosis. I do this by using a folding chair, which I cover with a plastic garbage bag for protection (I like my folding chairs).

First Day "Bleeding" Setup or "What 100lbs of Pork looks like"

With your surface prepared, place the pork leg skin down on the surface and use some object to prop it up at an angle to promote drainage of liquids onto the surface and into the receptacle you’ve positioned to catch the oozing. Leave it this way for 1 day.

On the second day, flip the prosciutto over and apply weight to it. Generally around 4-8 kilograms should suffice. Place the weights on the skin of the pork leg. Remember to keep the meat at an angle to promote drainage. Leave it this way for 1 day.

Once you’re done, continue through to my next post on the subject that shows you how to complete the curing process by preparing a flavourful brine.
2009's Prosciutto

Many of you foodies know that Prosciutto is absolutely delicious. Ham cured to perfection with the greatest balance of saltiness and flavour makes this food a favourite. This deliciousness comes at a steep enough price, a leg of Prosciutto di Parma can cost as much as 400.00$ once it’s been cured while local brands will cost upwards of 100$ and often be of very poor quality.

Over the past few years, I’ve been making Prosciutto quite literally in my parent’s Montreal basement. Over the next few days/weeks, I’ll be writing about how you too can make a great prosciutto at home given a cold damp room (I’ll take temperature/humidity readings in my parent’s cold room to give you an idea of what you need), lotsa salt, some herbs and of course a pork thigh!

At the left, you can see one of the Prosciutto I prepared in February, 2009. I cut this particular piece in late January 2010. Yup, almost 1 year to the day! There’s the most important fact about Prosciutto preparation: once the 12-day curing process is complete, the meat must slowly dry over the course of a year. If you’re anything like me, it’s not so easy to wait but the results will speak for themselves!

So call your butchers, clear out your cold rooms and start looking for table salt in your grocery flyers, we’ll get cracking soon!